
How to build a seakayak /PART 3
Third part of our tutorial on how to build a seakayak Bette 500 HV, using plywood and epoxy resin , with the so called “stitch and glue” system
cutting the panels and assembling the hull
time required:
-
part cutting: 6 hours
-
hull and bulkheads assembly: 8 hours
Cutting the seakayak’s parts
the first thing to do is to raise form the ground the “monster panel” obtained gluing two panels together, and place it on several (4 -5 is enough) trestles, so that we can cut the pieces with a certain degree of comfort; then we can begin to cut the pieces of hull, bulkheads, deck and so on, using several tricks:

- if you never used a jigsaw take some time to get trained; 15-20 minutes of training on cheap plywood clippings are enough to understand how it works, and achieve a good precision and a clean cut;
- 1mm is a huge distance: you have to stay with the edge of the blade on the border of pencil mark, not within and not far away on the outer side, excactly ON the border; within 15-30 minutes of practice you’ll see that 1 mm is a quite big distance, and that you can easily stay within this tolerance (and this fact marks again the importance of tracing smooth and sharp lines)
- cut slowly: when you think you’re going slow, slow down a little bit more, and try to gain much more precision and a cleaner cut; if you cut fast you’ll obtain a less accurate cut and you’ll shred plywood’edges to pieces
- cut 50-60 cm and then reposition the trestles to have always a steady support for the panel, so that vibrations are absent or minimal while you’re cutting
- take care to have a good lighting on area where you’re cutting; cutting with a poor lighting it’s tiring and leads to poor precision, a backapackers’ headlamp is really useful
- switch on the jigsaw, wait for the blade to gain its maximum speed and then begin to cut, same thing when when you switch off the jigsaw
- cut with the blade on the very edge of the marking lines, don’t stay far from it, or you’ll be forced to waste a huge amount of time sanding pieces to correct the mistakes
- keep your free hand quite near to where you’re cutting to smooth vibrations (I said QUITE near, not under the blade, PAY ATTENTION !!!!!)
- use protective glasses and protective mask when you cut
- when you finish the cutting operations, clean all the resin in excess form the joint pieces (the hull parts) and sand the joint’s side that will be on the outer parts of the hull until it’s perfectly smooth
at the end of cutting operations we’ll have the hull panels, the bulkheads, the lower deck panel; for now we need these parts, the others will be cut and put aside, as long as the spare parts of the panels;


Seakayak Hull assembly
things get really interesting now, and the hull takes shape in this stage
- let’s start form the bottom panels, we’ll join them on the bottom line (or centerline if you prefer), block them with a couple of clamps and drill them , 3m drill, 6-7 mm apart form the edge, and about 15 cm form one hole to the next one, for the whole bottomline lenght; ; we’ll drill the stern and bow too, with 5-6 cm of distance from one hole to the next one

- when we block the panels with clamps, we’ll manage to keep the joining on the outer sides, so that panels adhere perfectly, we’ll turn them before the assembly so that joins will be in the inner side of the hull
- assembly together the bottom panels (joints are inside) without tightening the cable ties, almost in the central part of the hull

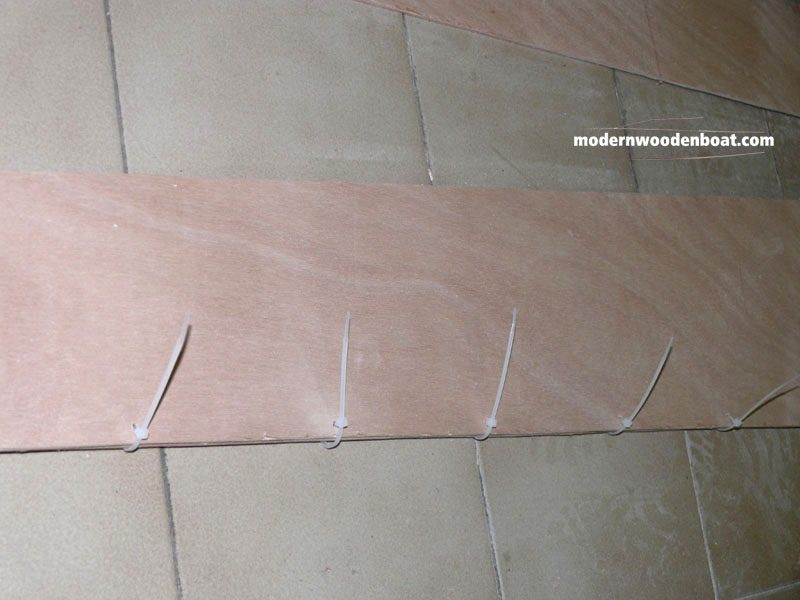
- now we’ll take a chine panel, starting form the bow, we’ll put it side by side with the bottom one, and do two holes close one onether, both on the bottom panel and on the chine one, place and tighten the cable ties, to avoid any movement between panels, then we’ll keep on marking holes at regular distances, drilling and tightening the ties, going form bow to stern;

- we have to avoid one big mistake: drill the holes in the bottom and chine panels and connect them with the ties in a second moment; the holes will be always in the wrong positions !
- we’ll proceed hole by hole, marking the right distances with pencil, drilling and tightening the cable ties, it’s a quite long operation but it’s the only way that guarantees a perfect alignment among panels; if panels will be one longer than another at the stern for about 10-20 mm don’t worry too much, we’ll fix this little mistake later;
- now we’ll assembly the side panel on the chine one; basically it’s the same operation that we’ve just done, we’ll start form the bow, mark, drill, place and tighten cable ties, and so on
- do the same thing on the opposite side of the hull, joining the twin panels on the bow and stern lines

at the end of this stage we’ll have the 6 hull panels tied together
now we’ll open the panels , like a kind of book, and we’ll insert the 4 bulkheads, tightening the bottom line ties if required; we’ll position the bulkheads properly as described in plans; before starting to fasten the bulkheads with ties let’s check that their shape meets with the hull panels, if this don’t happen we may change their positions, shifting them to bow or stern for few (2-3) centimeters; after we’ve found their best location let’s fasten them to the hull with cable ties; we’ll start tying them to the bottom panel, both sides , then we’ll check with a level if they’re vertical and we’ll also check their transverse position (that’s to say their distance from bow/stern is the same on both sides of the hull) , then we’ll mark their position with a pencil and drill holes consequently, images speak for themselves; at the end of this operations we’ll have the hull with its final shape and 4 bulkheads in their position


